This guide shows the configuration steps to use a Samba 4 active directory domain as a source for Fortinet FSSO. Linux based active directory domains are not directly supported by FSSO, therefore we will use the FortiAuthenticator as a „middleware“ which receives the logon events from the samba ad-dc using syslog and sends them to the FortiGate firewall using the FSSO connector.
FSSO allows the FortiGate Firewall to create policies based on the active directory groups a user belongs to, this is done by collecting the IP addresses of the workstation on which the domain user logged into.
Used software and products in this setup:
FortiGate 60F with FortiOS 6.2.4
FortiAuthenticator 6.5.1
Debian 12 with Samba 4 Domain Controller and rsyslogd
Client PC with Windows 10 Professional
I assume that the Samba 4 domain is already configured and that the basic configuration of the Fortinet products is already done. I will only show the integration of the components and not the basic configuration of all related products and software.
Settings on Samba 4 Domain Controller
The default Samba 4 config doesn’t log all information we need to set up the FSSO configuration.
We need Samba to print at least the username and the IP address of the workstation where the user logged in. The configuration will be done in the [global] part of the /etc/samba/smb.conf:
[global]
      ...
        log level = 3
        vfs object = full_audit
        full_audit:success = connect disconnect
        full_audit:failure = disconnect
        full_audit:prefix = User-Name:%U|Client-IP:%I|%S
        full_audit:facility = local5
      ...
I used rsyslog to send the samba audit logs to the FortiAuthenticator appliance.
I created a new configuration file /etc/rsyslog.d/00-samba.conf and added this line of configuration:
if $programname == 'smbd_audit' and $syslogseverity == '5' then @192.168.200.97rsyslog will now send all logs created by smbd_audit to the FortiAuthenticator which has the IP address 192.168.200.97 in my case.
Settings on FortiAuthenticator
The first step in the configuration of the FortiAuthenticator is to allow the receiving of syslog messages on one interface:

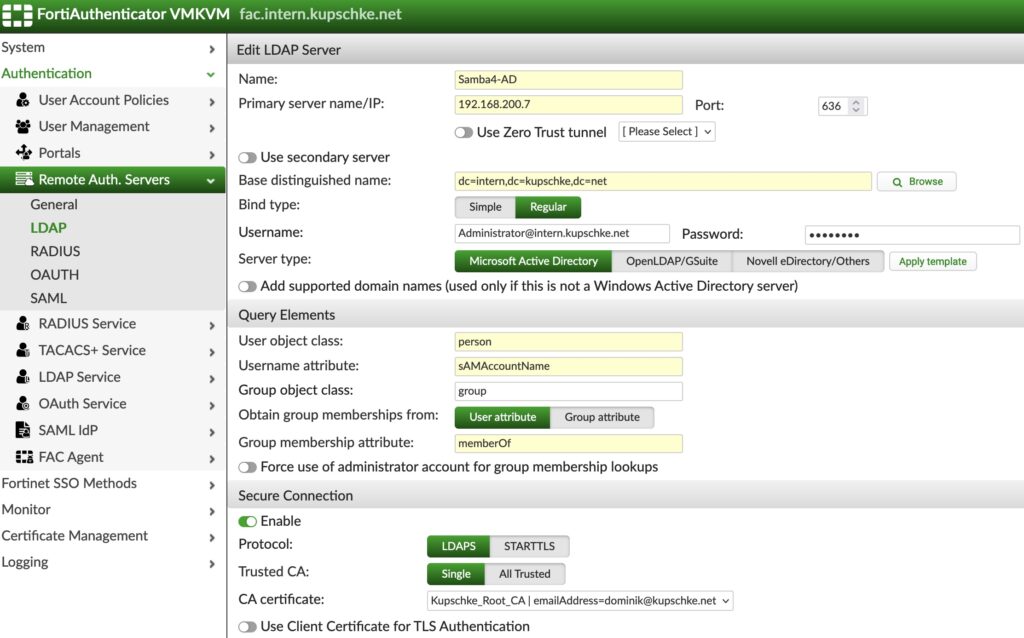
Then we need to add the Samba 4 server as an LDAP server. The fortiauthenticator checks the received usernames against the ldap server, to check if those are really existent and to which groups they belong to:

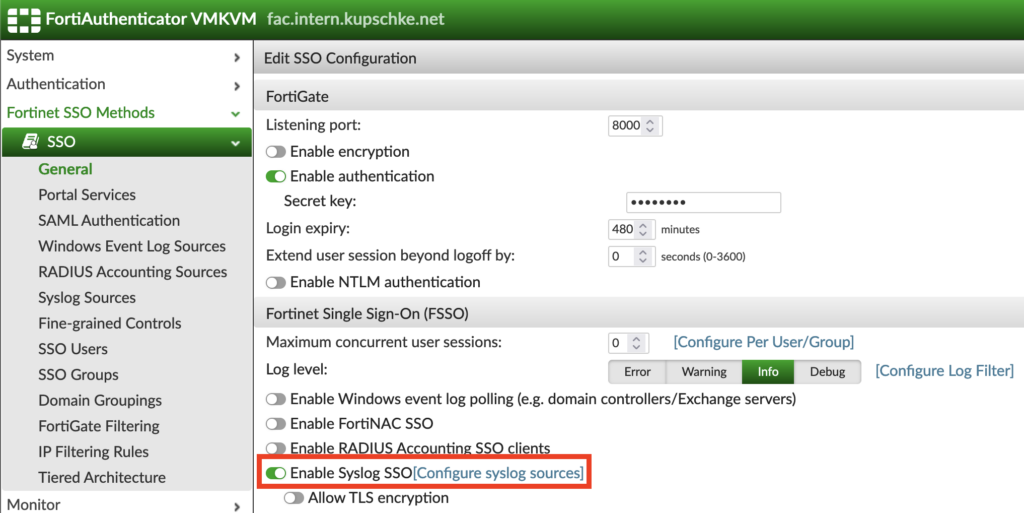
Then we need to allow „Syslog SSO“ in the general SSO settings:

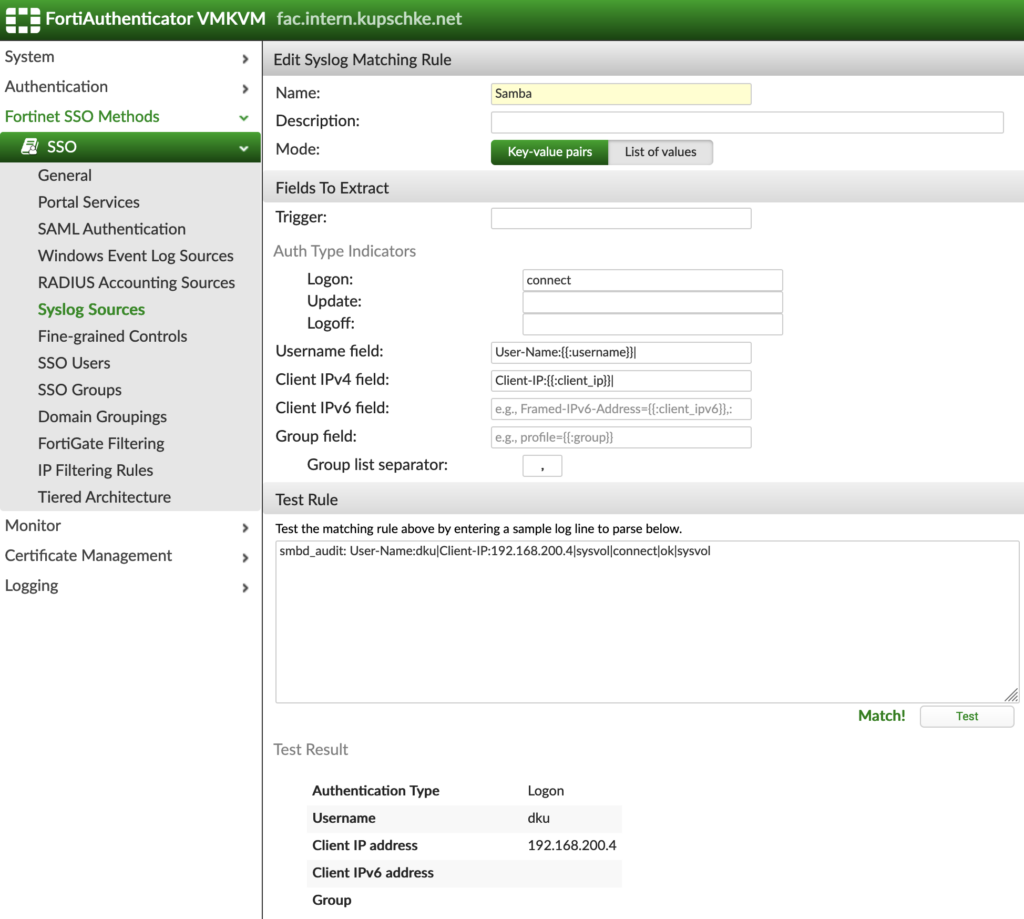
The domain controller sends several different log messages using syslog, therefore we must build a matching rule to extract the information we need.
This is an example of how a logon event looks like:
smbd_audit: User-Name:dku|Client-IP:192.168.200.4|sysvol|connect|ok|sysvolIn the „SSO –> Syslog Sources“ menu, we first switch to the „Matching Rules“ to create a new matching rule:

The new matching rule uses three keys to extract the relevant information:
- Logon = connect
- Username field = User-Name:{{:username}}|
- Client IPv4 field = Client-IP:{{:client_ip}}|

You can insert a sample log line to test if your matching rule will extract the information using the „Test Rule“ function.
After the matching rule is created, we must go back to the „Syslog Sources“:

Create a new Syslog Source and use the IP address of the samba domain controller, also add the matching rule we created in the step before. The „SSO user type“ should be set to „Remote users“ with the Samba 4 ldap server configuration selected, this will check if those are really existent and to which groups they belong to:

After the last step, we should be able to see the login events once a user logged in to his workstation:

Settings on FortiGate Firewall
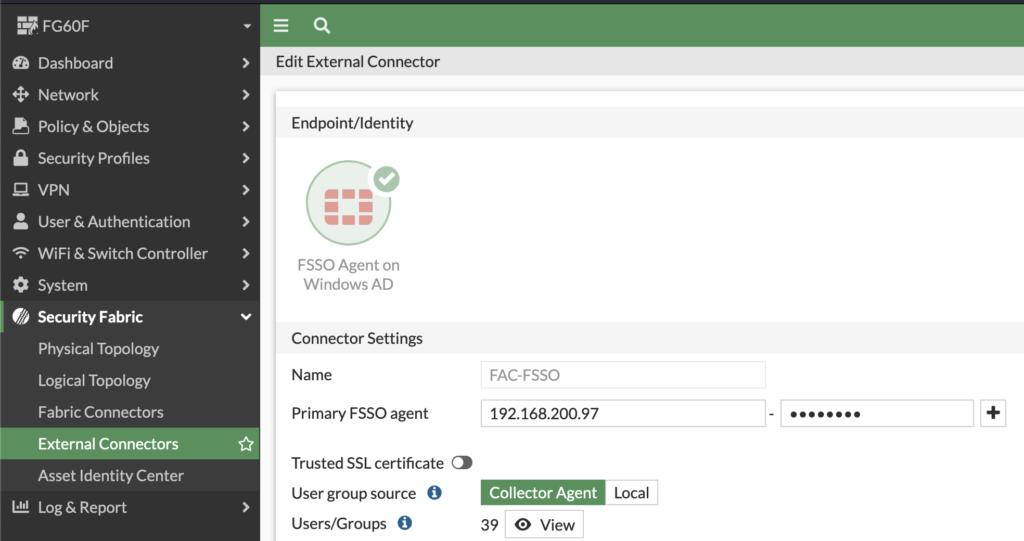
The FortiGate needs to be connected to the FortiAuthenticator using an FSSO Agent Connector under „Security Fabric –> External Connectors –> Create New –> FSSO Agent on Windows AD“:

This is the FortiGate FSSO configuration using the cli:
config user fsso
    edit "FAC-FSSO"
        set server "192.168.200.97"
        set password fortinetcanada
    next
end
„fortinetcanada“ is the default FSSO password, you should change it in a production environment 😉
You should be able to see the same user sessions on the fortigate, like you can see on the fortiauthenticator. Just go to „Dashboard –> Firewall User Monitor“ and don’t forget to click on „Show all FSSO Logons“ in the upper right:

As always, there is also a way to check this using the cli:
FG60F (root) # diagnose firewall auth list

192.168.200.4, DKU
        type: fsso, id: 0, duration: 381, idled: 101
        server: FAC-FSSO
        packets: in 30 out 31, bytes: in 13952 out 5966
        group_id: 33554456 33554449 33554446
        group_name: CN=USERS,CN=BUILTIN,DC=INTERN,DC=KUPSCHKE,DC=NET CN=DOMAIN USERS,CN=USERS,DC=INTERN,DC=KUPSCHKE,DC=NET CN=IT,CN=USERS,DC=INTERN,DC=KUPSCHKE,DC=NET

----- 1 listed, 0 filtered ------
The integration is now finished, you can start to use your active directory groups in your firewall policies!
Schreibe einen Kommentar